Many people struggle to add a payment gateway for their site. But now WPforms makes it super easy by introducing the Authorize.Net addon.
Authorize.Net makes it easy to accept credit card payments on your website using WPForms.
Authorize.Net has worked with retailers and small businesses to provide a credit card payment system. Authorize.Net payment processor works with over 430,000 merchant customers.
WPforms is a very simple and easy-to-use plugin. Now it comes with the Authorize.Net addon that makes it more useful. It’s one of the powerful and useful plugins with the number of capabilities that it has. You can put together some kind of intricate contact form for your business website in the contact section. To gather insight on what type of work you’re going to be doing for them.
Authorize.Net addon has awesome features.
It has the ability to accept all card payments online, accept, payments anytime, anywhere, on all devices. You can also sell products or services with one-time or recurring payments.
You can use Authorize.Net’s customizable advanced fraud detection. The best part about this addon is that it’s easy to use.
Here is a quick guide about how you use Authorize.Net with WPforms
Connect your WordPress website with the Authorize.Net account
For this, go to WPForms>>Settings and click on the Payment tab.
Configure the currency to your preferred choice.

Go to the Authorize.Net section of the page.
You will have to enter API Login ID and Transaction Key to authorize the connection between your forms and Authorize.Net.

Login to your Authorize.Net account and make sure your account is in Live Mode and not in Test Mode.
Now, Go to Settings>>API Credentials and Keys.

Copy the details and paste them into the WPForms tab.

Now, It will ask you for a Transaction Key.
You can get it from the API Credentials and Keys page in the Authorize.Net account.
In the Obtain option here, select New Transaction Key and then, click the Submit button.

It will send a Pin to your email address to verify your identity. Complete that process by verifying the Pin.

If you have completed all the above steps carefully then you will see your Transaction Key on your screen.

Copy that and paste it in the in WPForms Tab and click Save Settings.

Your WPForms Account is now successfully connected with your Authorize.Net Account.
Add Authorize.Net to WPforms.
You create a new payment form or you can edit your existing Payment forms by clicking the edit form button.
You can easily add the Authorize.Net field to your form. You can place it anywhere you like.

In order for a form to work with Authorize.Net, you’ll need at least four fields in your form:
- A Name field
- An Email field
- An items field
- An Authorize.Net field
Once any fields you’d like have been added to the form builder, you’ll need to go to Payments » Authorize.Net. From the Authorize.Net panel, check the box labeled Enable Authorize.Net payments.
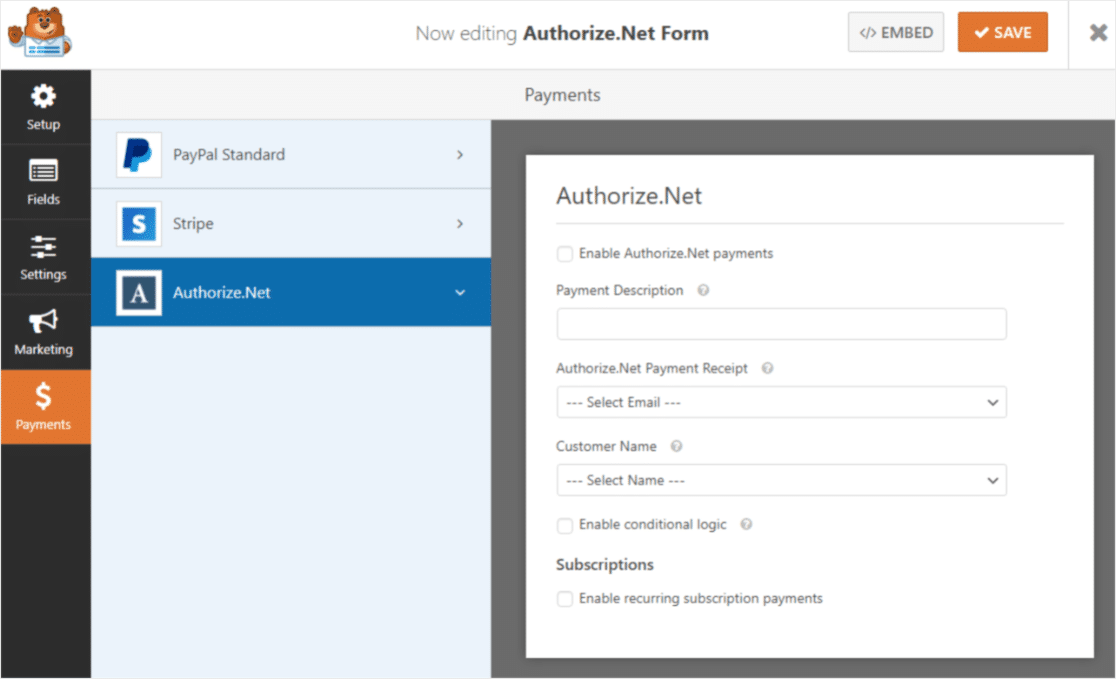
After enabling Authorize.Net payment, you need to configure some of the additional settings as well:
- Payment description.
- Select Authorize.Net Payment Receipt.
- Customer Name field
You can also adjust the remaining settings if needed.
You can also easily embed the payment form on any of the website pages by using the shortcode or by using the WPForms block in the Gutenberg editor.

You can now easily accept payments using Authorize.Net.


Leave A Comment